Quinoa Black Bean Burgers

I love black bean burgers, melt a little provolone and A1 sauce and its better than any burger! Our family has recently started using more quinoa in recipes, so I decided to try this quinoa black bean burger recipe. It was delicious!! I didn’t think to saute the onion, garlic and bell pepper before I mix the burgers together, but next time I will try that! I also added more than the garlic recommended. Recipe and photo from Allrecipes.com 

Makes 5 burgers Prep time: 15 minutes Cook: 20 minutes Ready in: 35 minutes

Ingredients: 858677

1 (15 Ounce) can black beans, rinsed and drained
1/4 cup quinoa
1/2 cup water
1/2 cup bread crumbs
1/4 cup minced yellow bell pepper
2 tablespoons minced onion
1 large clove garlic, minced
1 1/2 teaspoons ground cumin
1/2 teaspoon salt
1 teaspoon hot pepper sauce (like frank’s redhot)
1 egg
3 tablespoons olive oil


Directions
  1. Bring the quinoa and water to a boil in a saucepan. Reduce heat to medium-low, cover, and simmer until the quinoa is tender and the water has been absorbed, about 15 to 20 minutes.
  2. Roughly mash the black beans with a fork leaving some whole black beans in a paste-like mixture.
  3. Mix the quinoa, bread crumbs, bell pepper, onion, garlic, cumin, salt, hot pepper sauce, and egg into the black beans using your hands.
  4. Form the black bean mixture into 5 patties.
  5. Heat the olive oil in a large skillet.
  6. Cook the patties in the hot oil until heated through, 2 to 3 minutes per side.


Dangerous Cookies

There is a fight in our house: soft cookies or crispy cookies. My hubby likes his chocolate chip cookies crispy. I love them soft and chewy! I stumbled across this recipe and these cookies are delicious. I found them maybe two weeks ago and I’ve made them three times! I’m baking some today for a dinner party tonight. I had a friend over yesterday and she loved them so much, she asked me for the recipe today. There are some secrets that help make these cookies, soft, thick and chewy! Recipe and Photo from Back for Seconds! Check out her site for more delicious recipes.  Here are her tips for making these cookies perfect. Tip #1: Add 2 TBS of canola(or vegetable) oil to the batter. This simple addition kept these cookies soft and fresh for over a week!! Tip #2: to a great chocolate chip cookie is to add 2 TBS of cornstarch to the dough. It makes the cookies fluffy and soft! Tip #3: I added 2 types of chips, which sounds so simple but it really made a big difference in the flavor. Mini semi sweet chips and milk chocolate chips are the perfect combination and they fill every bite with oozy, melty, chocolate goodness! I will have to make sure to buy two different types of chocolate chips-I have not tried this tip because I only used what I had on hand. So if you don’t have two types of chocolate chips-one will do just fine. Tip #4: Let the dough chill for about an hour. This helps ensure that the cookie doesn’t spread too much while baking. I usually don’t chill my dough because that gives me more opportunity to eat and have no cookies to bake! 😉 And finally, tip #5: When scooping the dough onto the cookie sheet, pile the dough high! I just used a regular spoon and heaped large spoonfuls of dough onto the tray, making sure they were tall! This helps create a nice thick cookie! Enjoy!! Tell me, which do you like better, soft or crispy chocolate chip cookies?

the-best-ever-soft-and-chewy-chocolate-chip-cookies

Chewy Chocolate Chip Cookies

Prep time 1 hour, 15 minutes
Cook time 10 minutes
Total time 1 hour, 25 minutes
Ingredients

1 cup butter (softened)
2 tablespoons canola oil
1 cup brown sugar
1/2 cup sugar
2 eggs
1 teaspoon salt
2 teaspoons vanilla extract
1 1/2 teaspoon baking soda
2 tablespoons cornstarch
3 1/4 cups flour
1 cup milk chocolate chips
1 cup mini semi sweet chocolate chips
Directions

Step 1
In a large mixing bowl cream together butter, oil, and sugars until light and fluffy. Add eggs, vanilla, and salt and mix until combined. Add in the baking soda and cornstarch and half of the flour and mix well. Pour in the remaining flour and mix only until combined. Stir in chocolate chips and cover and chill for one hour.
Step 2
Preheat oven to 350
Drop heaping spoonfuls of dough onto ungreased cookie sheets, making sure the piles of dough are nice and tall. *If using a cookie scoop, scoop one ball of dough right on top of another one. This is what makes the cookies thick!
Bake 7-8 minutes for medium sized cookies or 10 minutes for large cookies. Pull them from the oven when the edges are slightly golden and the centers look just barely done. After 2 minutes remove cookies from sheets onto cooling racks.
Store in an airtight container at room temperature.

Read more at http://backforsecondsblog.com/2013/09/how-to-make-soft-thick-chewy-chocolate-chip-cookies/#z5SZT2BEK2qOM8bE.99

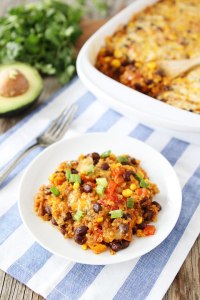
Black Bean & Quinoa Enchilada Bake

Quinoa was labeled the healthiest food of 2013. I know from my mom’s experience is that it can be tricky to cook quinoa. If you don’t cook it with the right things, it has a bitter taste. But if you make it just right, its delicious! As I was browsing Pinterest to find new recipes I came across this one. Looking for healthy things for us all to eat, I was excited to try this recipe. It looked delicious, smelt delicious and tasted delicious. Put some Chalua on it and it makes it even better. My husband ate his with chips. He liked the flavor but had to get used to the texture of the dish. Sweet Baby enjoyed it as well. Recipe freezes well and I was able to assemble in the afternoon and throw in the oven when the hubby was on his way home from work.

Recipe and photo from Two Peas & Their Pod. Check out their site for more delicious recipes to try. It is a new favorite of mine and the best part is it’s only 6 WW points for one serving! Quinoa is packed with protein so one serving can go a long way! Tell me what you think!

Black Bean & Quinoa Enchilada Bake

Yield: Serves 8-10   Black-Bean-and-Quinoa-Enchilada-Bake-8
Prep Time: 10 minutes
Cook Time: 35 minutes
Total Time: 45 minutes-includes churning time
 

ingredients:

1 cup uncooked quinoa, rinsed
2 cups water
1 tablespoon olive oil
1 small onion, diced
3 cloves garlic, minced
1 jalapeño, seeds and ribs removed,diced
1 red pepper, seeds removed, diced
1 orange pepper, seeds removed, diced
1 cup corn frozen kernels
Juice of 1 small lime
1 teaspoon ground cumin
1 tablespoon chili powder
1/3 cup chopped cilantro
Salt and pepper, to taste
2 (15 oz) cans black beans, drained and rinsed
2 cups red enchilada sauce  ( I put 3 cups)
2 cups shredded Mexican cheese
Toppings: Sliced green onions, avocado slices, sour cream, optional

directions:

1. Preheat the oven to 350 degrees F. Grease a 9×13 baking dish with cooking spray and set aside.

2. Add quinoa and water to a medium saucepan and bring to a boil over medium heat. Boil for 5 minutes. Turn the heat to low and simmer for about 15 minutes, or until water is absorbed. Remove from heat and fluff with a fork. Cover quinoa and set aside.

3. In a large skillet, heat the tablespoon of olive oil over medium-high heat. Add the onion, garlic, and jalapeño. Sauté until softened, about 5 minutes. Add in the peppers and corn. Cook for about 3-4 minutes. Add the lime juice, cumin, chili powder, and cilantro. Stir to combine. Season with salt and pepper, to taste.

4. In a large bowl, add the cooked quinoa and black beans. Add the sautéed vegetable mixture and stir to combine. Pour in the enchilada sauce and stir. Add 1/2 cup shredded cheese.

5.Pour the black bean and quinoa mixture into the prepared baking dish. Top with remaining shredded cheese. Cover the pan with foil. Bake for 20 minutes, then remove foil. Bake an additional 10 minutes, or until the cheese is melted and edges are bubbling. Remove from the oven, and let cool for 10 minutes. Garnish with toppings, if desired. Serve warm.

Note-this recipe freezes well!

Oreo Rice Krispie Treats

I have been craving Oreos recently! So when I found this recipe I was ecstatic! I love Rice Krispie treats and I love Oreos so I not put them together? Last night I had my girls Bible study so I decided to make this treat for them. Mostly to save myself from eating a whole pan of Rice Krispie treats. And they were a hit! The best thing is you only need a few things & they are quick and easy to make! With Valentine’s Day around the corner feel free to drop a few drops of color into the white chocolate that you drizzle on top. Make a perfect treat for you and your Valentine. Enjoy! Recipe & photo courtesy of Lauren Conrad.

Oreo Rice Krispie Treats

20140124-145421.jpg

Creamy Tomato Bisque

My favorite place to order tomato bisque is Bj’s brewhouse. Just delicious. They put these delicious, buttery croutons on top – divine! Every time I would eat it, I would turn to hubby and say, I need to learn how to make a good tomato bisque. So I found this delicious recipe from Wilderness Wife. This soup was easy to make too. It doesn’t taste like Bj’s and I’m still going to find a way to make it as delicious.  I didn’t have any curry or bay leaf – maybe that is the missing ingredient. Or as my hubby put it- everything could always use more butter!! This soup is 11 weight watchers points and serving size is 8.

Enjoy! Maybe make a grilled cheese with it. 😉 Recipe courtesy of Wilderness Wife.

Ingredients
  • ¼ lb. butter
  • 1 c. chopped celery
  • 1 c. chopped onion
  • ½ c. chopped carrots
  • ⅓ c. all purpose flour
  • 2 (1 lb. 12 oz.) cans of whole tomatoes, drained and chopped
  • 2 tsp. sugar
  • 1 tsp. basil
  • 1 tsp. marjoram
  • 1 bay leaf
  • 4 c. chicken broth
  • 1 pint heavy cream
  • ½ tsp. paprika
  • ½ tsp. curry
  • ¼ tsp. white pepper
  • pinch of salt (to taste)
Instructions
  1. Melt butter in a large soup pot.
  2. Saute onion, celery, and carrots until tender.
  3. Add the flour, and stirring constantly, cook for 2 minutes.
  4. Add tomatoes, sugar, basil, marjoram, bay leaf and chicken broth.
  5. Simmer for 30 minutes while stirring occasionally, then discard bay leaf.
  6. Puree using the appliance of your choice. I use an immersion blender, but a regular blender or a food processor will work.
  7. Add cream, paprika, curry, pepper and salt.
  8. Stir to combine.
  9. Serve hot or cold.

From My Kitchen: Overnight Oats

Sweet Baby has been a bit of a challenge lately with breakfast. I came across this recipe from Tia & Tamera for Overnight Oats.  The best part is that it’s so easy to make! I prepared it the night before, letting it refrigerate – and in the morning, you have a delicious breakfast.  It’s also good for your body, unlike sugary cereals; overnight oats are full of good fiber, healthy probiotics and calcium.  Sweet Baby loved it! My hubby thought it was good-I think he would’ve liked it cooked. So from their kitchen, to mine and now to yours! Enjoy!

Ingredients:
1/2 – 2/3 cup rolled oats
2/3 cup coconut milk (or any other milk you like- I used almond milk)
1/3 cup plain yogurt (vegans – you can omit this or replace with a vegan yogurt!)
1/2 mashed banana (optional)
1 teaspoon flaxseed (or chia seed)
1 pinch of cinnamon

Instructions:

1.) Mix: Mix together all the ingredients above and seal in an airtight container

2.) Refrigerate: Put it in the fridge overnight

3.) Enjoy: Enjoy your delicious, healthy breakfast!

The fun part of this recipe is all the things you can add fresh fruit and a drizzle of honey in the morning.

~Our Sweet Life~

Pretzel Rolo Sandwich

I had my women’s bible study recently and decided to bring these quick and delicious snacks, Pretzel Rolo. With all the Halloween candy specials you can makes these cheap and quick! Sorry I didn’t get around to taking a picture but they were gone!

  • waffel pretzels
  • rolos

Put the pretzels on a baking sheet. Place one rolo candy on each pretzel. Pop them in the oven at 350 for 4-5 minutes. They will look shiny, but they will still look like a rolo, they shouldn’t melt all over the place. Take them out of the oven and place another pretzel (or pecan) on top of each rolo candy. Be careful not to burn yourself on the hot caramel or the sides of the baking sheet. Then, gently push down squishing the rolo. You do need a light touch on this part because if you squish them too much the rolo gets everywhere and they’re hard to remove from the pan when cooled.

Let them cool at room temp, then pop them in the fridge or freezer to cool completely. I store in the fridge to keep them longer, but remove them an hour or so before eating so the caramel softens up a bit. You can also store just in a covered tuperware container at room temp if you plan on eating them within a few days.

Whole Wheat Flaxseed Chocolate Chip Cookies

We have being living at our home for a year now and we know more of our neighbors than our old place were we lived for 3 years! I love our neighbor next to us, she’s always bringing us stuff she’s baked. This her recipe. Without walnuts these cookies are 4 weight watchers points. Enjoy!
20130822-132323.jpg

1st bowl
1 c. White flour
1 c. Wheat flour
1/4 c. Flaxseed
1 tsp salt
1 tsp baking soda

2nd bowl
1 stick butter softened
1/2 c. White sugar
1/2 c. Brown sugar
2 tsp. vanilla
2 eggs
1/2 c. Applesauce

directions
Mix dry ingredients
Add into wet ingredients
Add chocolate chips and/or walnuts

Bake at 375 on 2nd shelf for 8-9 minutes. Let sit on top of stove for 2 minutes to finishing cooking. Yummy!

How to Tell if Watermelon is Ripe

070312-watermelonpops

I love watermelon, but I always pick the wrong ones! To ensure you get a winner, look for oblong or well-rounded melons that sound hollow when slapped. The rind should be dull and just barely give to firm pressure. Steer clear of fruit that has flat or soft spots and punctures in the rind. Watermelon is the perfect fruit for summer time! Go and may the force be with you as you pick your watermelon.

Need ideas? Here are 4 ways to serve watermelon.

Random Kitchen Tip: Produce

fresh-produce

I’ve been trying after I get home from the farmers market to cut up all the produce so that it’s ready to go. I can’t count the times I’m just in a munching mood but too lazy to cut up a watermelon or bell peppers. Or I can’t count times when I’m finally in the mood to cut up the produce and it’s molded! I hate wasting money on produce!  So I’ve made the commitment to do right when I get home. It takes extra work, especially since usually when I get home I’m ready to sit down and relax. But it’s worth it. We end up eating most to all our produce. Having the bell peppers chopped and ready to go, we  can add them to our eggs for breakfast. Easy! Have a blessed Thursday!

~Our Sweet Life~